If you’re new to list building then you want to check out my GrooveMail review first.
That article will explain what GrooveMail is and how to create your first email list in GrooveMail.
To summarize, GrooveMail is a Groove’s full-featured email marketing and CRM system.
It’s similar to ActiveCampaign and has a host of marketing automations based on a contacts user behavior.
With your free GrooveFunnels account, you can create 1 GrooveMail contact list and add up to 500 contacts.
How To Create An Email Sequence And Automation In GrooveMail
In the first part of the GrooveMail tutorial series, I show you how to:
- Set up sender id
- Verify your sender id
- Create an email list
- Create tags opt-in forms, and
- Embed it in GroovePages.
If you haven’t seen the first part of this tutorial, I suggest you read and watch that video first here before reading this.
These tutorials build upon each other and it will only make sense if you’ve implemented the first part of the series.
In this post, we’re going to continue with the same example by adding a welcome email sequence and create an automation.
If you’re new to GrooveMail, you can create your Free GrooveMail account and get up to 500 email contacts for free and receive extra training bonuses from me as well.
Creating A GrooveMail Email Sequence
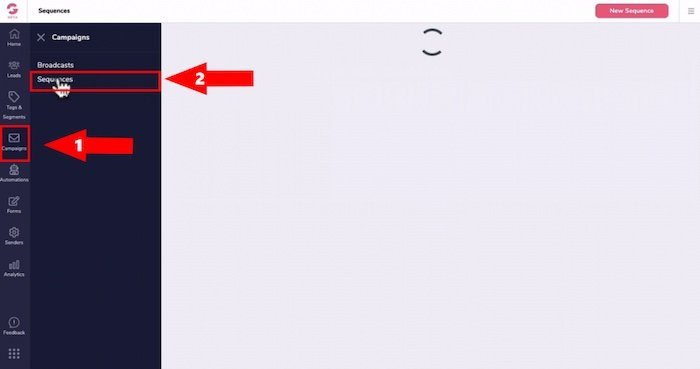
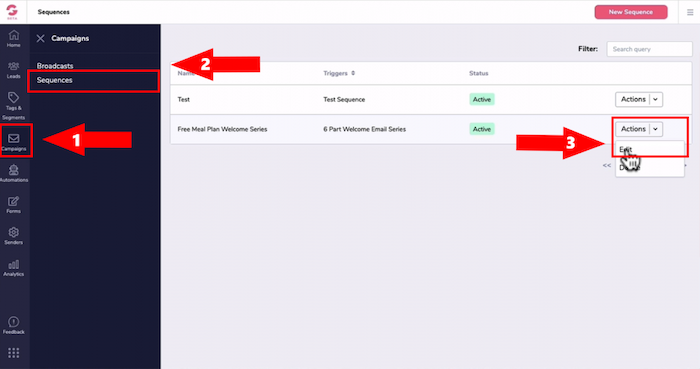
- Log into GrooveFunnels and click on the GrooveMail app.
- In order to create a sequence head to “Campaigns” and click on the “Sequences”.
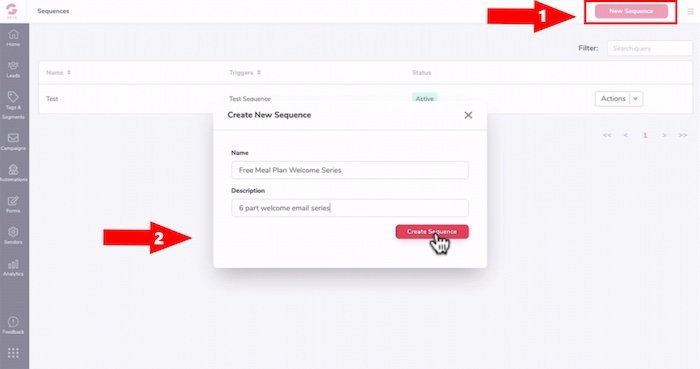
- Click on “New Sequence” on the top-right and give your sequence a nem.
- For this tutorial, I’m going to show you how to set up a six welcome email series so let’s call this “Free Meal Plan Welcome Series”.
- Under description, we’ll call this “6 part welcome email series” and then click on create.
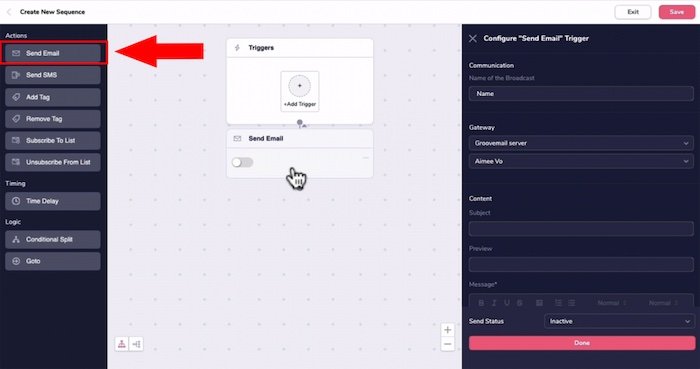
- Once you clicked on “Create Sequence”, it will transition to the email sequence builder as seen on the image below.
- On the Left panel, under “Actions”, drag in the “Send Email” element and pop it into the canvas over on your right.
- Then your configuration tab will pop open on the right.
So let’s go through it…
- Under the “Name of the Broadcast”, since this is the first email in the sequence, let’s call this “Welcome series – Email 1”.
- Under Gateway, you will select GrooveMail server.
- Under Sender, you would select your name as a sender or whichever sender name that you’ve set up previously.
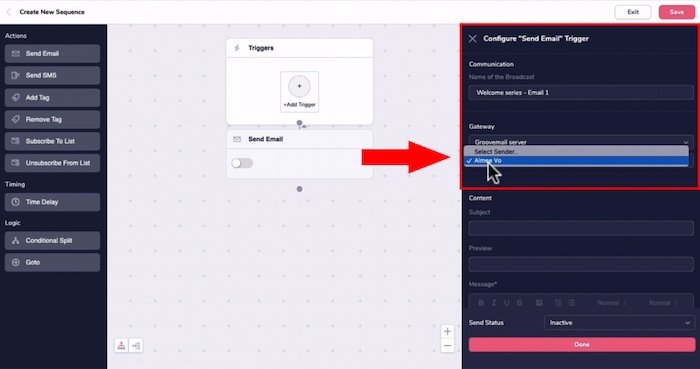
- If you don’t have any sender options here then you need to set up email sender ids here.
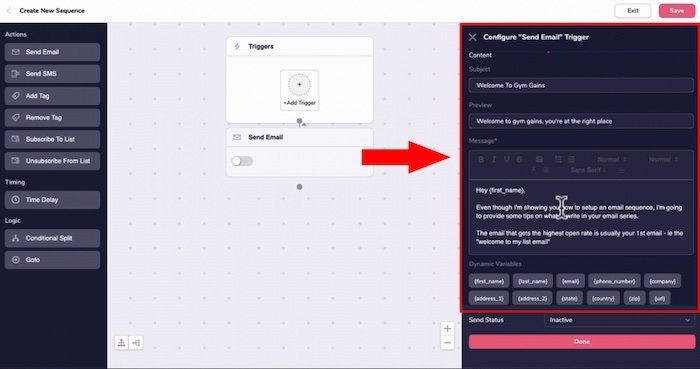
- Under “Content”, this will be the subject headline of your email. I’m going to call it “Welcome to Gym Games”.
- Under “Preview”, this will be a sentence snippet that users will see before they open up their email. We’ll add “Welcome to gym games, you’re at the right place”.
- Under “Message”, this is where you’ll add in your email copy so to personalize your email.
- You will type in “hey” scroll down a bit and click on ‘first_name’ dynamic variable and then type in comma to the next line.
- And I’ll paste in some email copy that I prepared earlier.
TIP: Plan out first your email sequence from the title to the message of the email sequence so it would be easier.
Even though I’m showing you how to set up an email sequence, I’m going to provide some tips on what to write in your welcome email series.
Now the email that gets the highest open rate is usually your first email. ie. the “Welcome to My List Email” which is email number one.
1st Welcome Email Copy Tips:
- The 1st email is where you deliver your lead magnet or what you promise people in exchange for their contact details.
- Get people to actually use your lead magnet or the products.
- Give them helpful information.
- You may also tell your backstory or your brand story.
- Tell people what to expect in the next email series.
- Ask people to take an action like “reply to this email” or “check out this particular page”.
Now a lot of people think that they can’t sell in a welcome series or an onboarding email series. I would totally disagree with this.
The format of it is usually…
- Send a couple of nurture emails
- Introduce people to who you are, and what you do
- Share one or two personal stories that are engaging that are emotional then
- You can ask people to buy whatever it is you want them to buy.
Alright now that you know what to write in your first email…
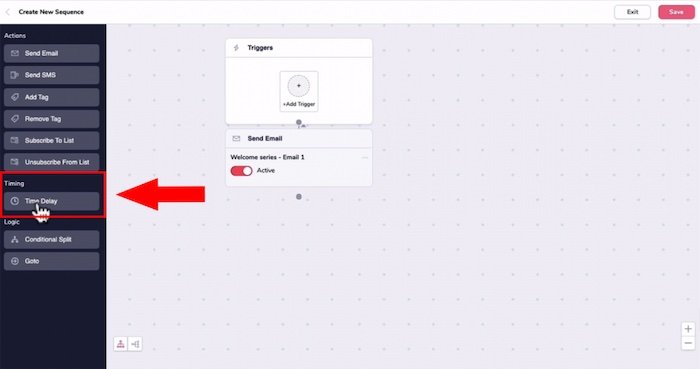
- Next, scroll down the configuration.
- Under “send status”, click on it and select “Active” then click Done.
With a welcome or email autoresponder series, you may decide to have six emails, sent one day apart.
Adding Time Delay
- Let’s head over on the left panel.
- Under “Timing” drag in a “time delay” and pop it on the canvas.
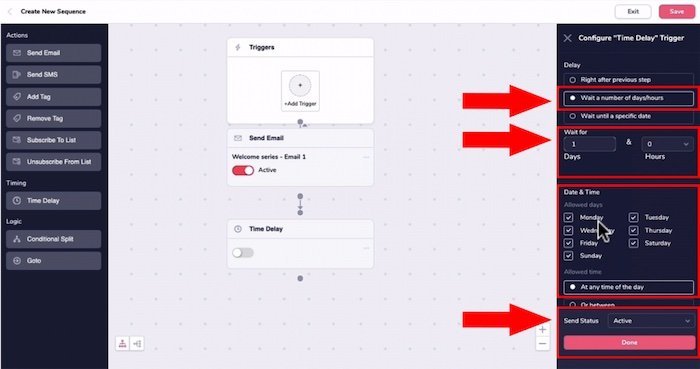
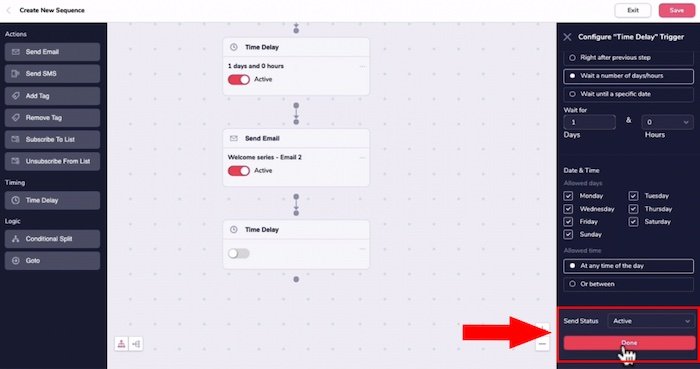
- Configure the delay by clicking on “Wait a number of days/hours”.
- Under “Wait for”, you can type in one for one day or even 12 hours apart depending on your email sequence before the next email will be sent.
- Under “Date & Time”, I’m just going to leave as is and allow GrooveMail to send it on any time of the day.
- Then on “Send Status”, select “Active” and click on “Done”.
- Let’s head back over on the left panel and then drag in again the “Send Email” which will be the 2nd email that will be sent out.
- So continuing the welcome email series over on the configuration tab, we’ll name this “Welcome Series Email 2”.
- The gateway and sender name is already pre-set.
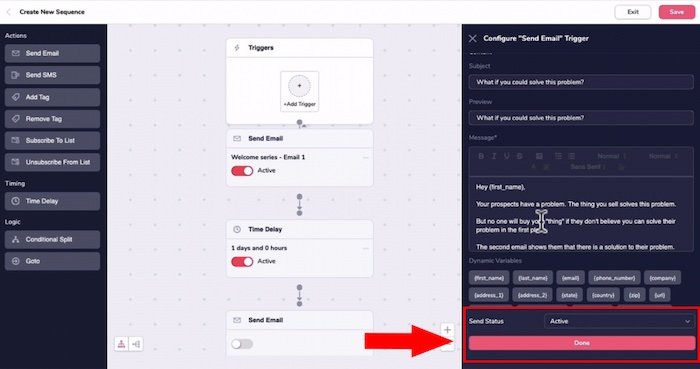
- And under “Content”, the subject headline for email 2 you can introduce what problem you could solve for the prospect.
- For the preview snippet, I’m just going to add “What if you could solve xyz problem?”.
- To start your Message, type in “Hey” and the code for their name to personalize it.
2nd Welcome Email Copy
Now remember that your prospect has problems.
The “thing” you sell, solves this problem but no one will buy your “thing”.
If they don’t believe you can solve their problem in the first place.
The second email shows that there is a solution to their problem.
So if you think of the buyer’s journey they go from “I’m aware, I have a problem” to “solution aware”, which means in the email copy:
- You can tell a story of a client who has a problem with what they need to do to solve that problem.
- And what they think they need to do but actually don’t in order to solve that problem.
- Mention what they think they need to do
So once you answer those questions in your email by tearing down the “thing” they think they need.
Fill in the “thing” they actually need that can form the basis of the second email.
Once you’ve done so, go to “Send status” then click on “Active” and then press “Done”.
- In order to build-out this sequence, you can hold on to the canvas and pull it up so you can see the sequence and then release.
- Let’s head over on the left panel and add another “Time Delay” by dragging it in the canvas.
- We’re going to leave it at “Wait a number of days” to one day.
- Allow it to send at any time of the day and click on “Done”.
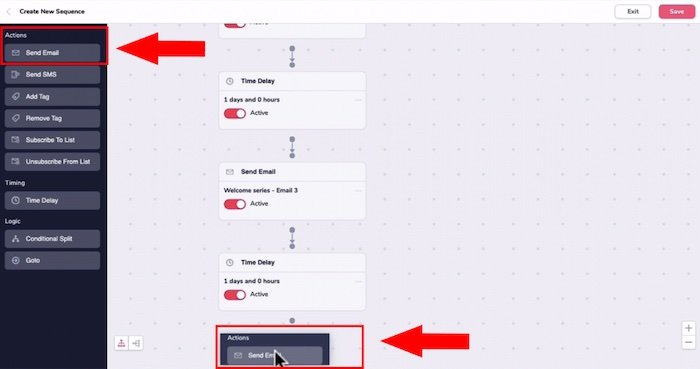
- Then under “Actions”, drag in another “Send Email” and pop it in the canvas.
- We’ll name this email “Welcome series email 3” with the subject, “It’s not your fault” then add the same for the preview.
How To Increase Click Through On Emails
If you’re pitching your own products or service, one way to get people to click on your email links is to add an image that SHOWS your product in action.
People are usually skimming your email but they stop when they see a compelling image.
You NEED unique custom 3d mockups, book covers, lead magnet images, online course mockups… to get that click.
I’ve always struggled with design and could not justify hiring expensive graphic designers.
Not anymore.
The banner below was created WITHOUT any design skills and under 60 seconds.
Just point-and-click, drag-and-drop, then export!
Click the banner to learn how you can create stunning 3D digital product mockups to use in your emails or sales funnel without any design skills.

3rd Welcome Email Copy
A type of email content you could send is “It’s not your fault”.
- Introducing a personal story about a problem. For example, “eating healthy was not always an option growing up for you…”
- Then mentioned why it’s not their fault and say, “my parents worked a lot and I found myself eating whatever was available: instant noodles or microwave meals.”
- And how you overcame the problem. “It took me years of learning nutrition eating the foods that were nutritionally dense to fill my body”.
Basically, the core message of the third email in the welcome series is “this can be hard, no one teaches you, it’s not your fault and here’s how you can solve the problem”.
Then once you entered in your message, Active its “Send Status” and click “Done”.
- Now we’re going to add another timer delay by dragging “Time Delay” on the left panel and set it to one day then click “Done”.
- Again, drag in another “Send Email” to the canvas for the 4th email.
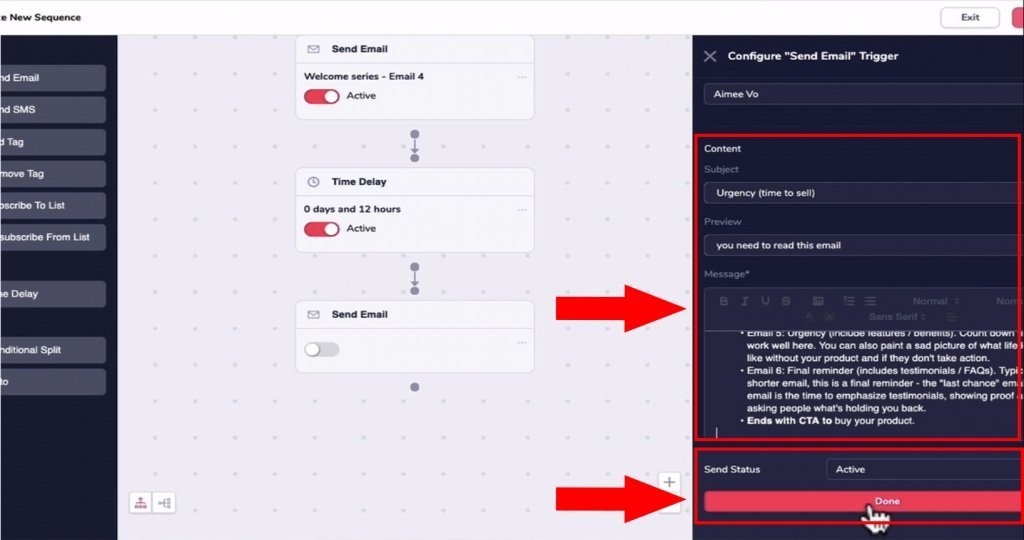
- We’ll name this “Welcome series email 4”.
- For the “Subject” you can talk about “Five benefits”.
- For preview, you would write your own snippet however I’ve added “Here’s five benefits to your problem”.
4th Welcome Email Copy
In this email, you’re going to address:
- how your offer can change someone’s life
- convince the reader that you can help them.
- You future pace your reader by telling them the benefits at four stages.
The Four Stages:
- Right after buying your product,
- A month after buying your product,
- A few months or a year
- After buying the product and the rest of your life.
- So you want to lay out the benefits in the above order and use phrases like “think about”, “what if”, “imagine”.
- Essentially, future pacing, the possible benefits your prospect could achieve by buying your product.
- You can outline it as a story of one of your successful clients.
- And what happened to them right after they bought the product.
- So once you’ve completed this particular email just press “Done”.
- Head over here and drag in another “Time Delay” and pop it on the canvas.
- For the 5th email, set it to 1 day then click on “Done”.
- Then drag in another “Send Email” for the 5th email.
- Configure the 5th email, we’ll call this “Welcome series email 5”.
- For the subject headline, you want to create some urgency so it’s your time to sell.
- And for the preview, you may type in “You need to read this email”.
Essentially, email 5 and 6 is where you make the sales.
If you’ve ever run an email funnel for a product launch, you would know that most of the sales come at the end.
Sure, some people will buy at the beginning of the email series however, emails 5 and 6 are usually sent on the same day to ramp up the urgency.
5th Welcome Email Copy
- Have urgency but you include features and benefits;
- Countdown timers work really well in email five and
- You can paint a sad picture of what life would look like without your product.
6th Welcome Email Copy
For email number six, I’ve grouped them all in here but you would repeat the same process again.
- This will be the final email reminder and this is where you include testimonials, frequently asked questions.
- Shorter email as it acts as a final reminder so this would be called the “last chance email”.
- Emphasize testimonials showing proof and asking people what’s holding them back from taking action and purchasing your product.
- End your email five and six with a call to action to buy your product.
Then press “Done”.
Now this is basically s a welcome email series sequence and there are different types of email sequences for different types of goals.
For this email sequence, we’re trying to nurture a prospect and lead them to buy a product and there are essentially five to six emails in this sequence.
So for your welcome email sequence, I recommend anywhere from five to six emails.
Naturally, if you were to create a buyer email sequence the copy would be different.
Now that you understand what to put in your emails, let’s go through how to format your emails…
Formatting Emails
- To edit the email head over the email which you would edit and on the right side, there are three dots that you can’t really see but once you hover over that you can click on the pencil icon to edit.
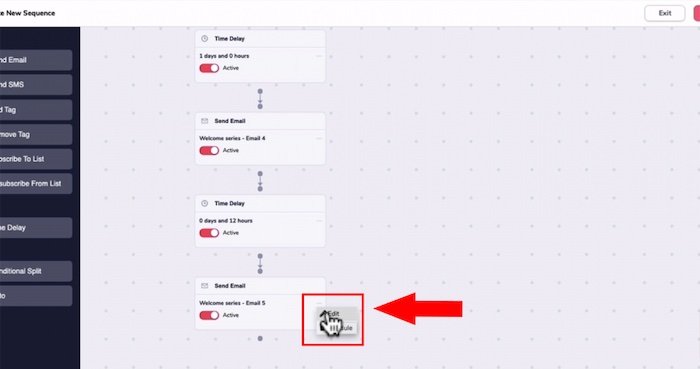
- Once you click on the edit button, you’ll see the email formatting box below:
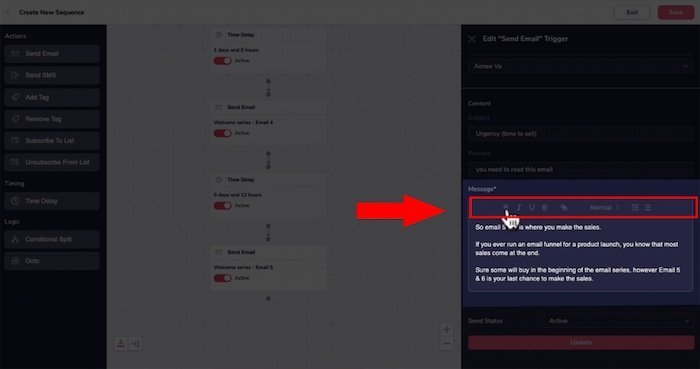
On the “Message” area, there is a toolbar which you can customize your messages.
- The first button is to bold your text, followed by a button that italicize the test.
- The next button underline words after that is a button that enables you to place a line across in your text.
- The link icon is used to hyperlink any specific text.
- You could change your text Heading from a normal to 6th heading.
- You could use a number list your text by highlighting it and then clicking on the list icon or you can turn it into a bullet point by clicking on the last icon.
- Once you have customized your message, click the “Update”.
2 Options To Trigger An Email Sequence
Once you’ve completed all your emails in the sequence, there are two options to trigger this email sequence.
1. Creating A Trigger Via A Email Sequence
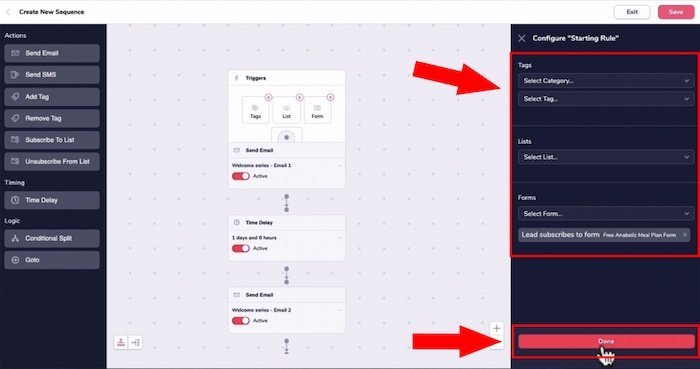
- Head back up top and clicking on “+Add Trigger” over on the top of your sequence..

You can trigger this email sequence based on tags.
In the first tutorial showed you how to set up tags with categories of tags.
If you haven’t seen it, check it out here.
Triggering An Email Sequence By A Tag
- For this particular sequence, let’s say that our tag is under the “prospect category”.
- In “Select Tag”, select “free anabolic meal plan tag” so essentially we can trigger this email sequence.
- Once a tag of “free anabolic meal plan” is applied to the contact and
- Trigger this email sequence if someone is added to the health website list, OR
- You can trigger when someone opts into the free anabolic meal plan form.
- Press “Done”.
- That’s how you can configure the starting rule to trigger all six emails in this particular sequence.
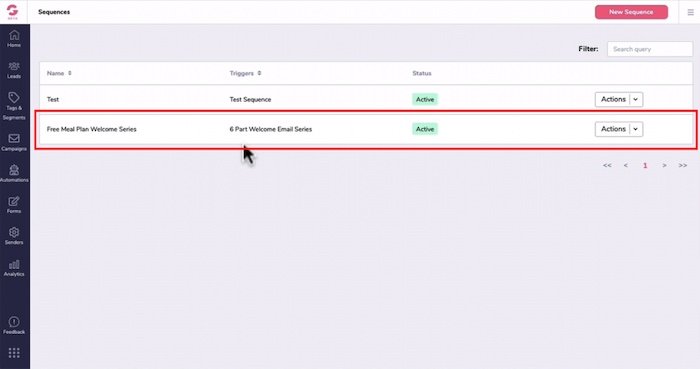
- Press “Save” on the top right.
- You can see here that the “Free Meal Plan Welcome Series” is added as a sequence.
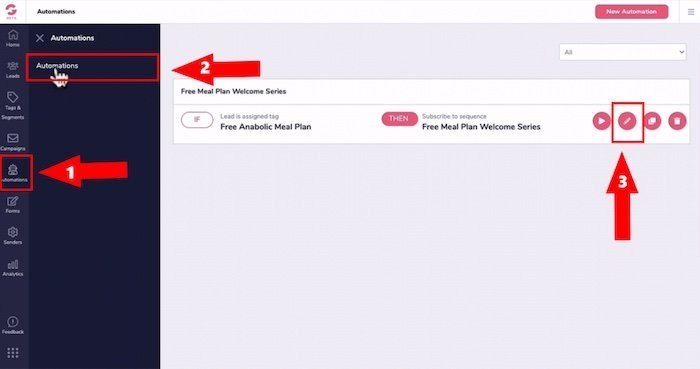
2. Creating An Automation To Trigger Email Sequence
- Let’s go through option two, which is creating automation to trigger this email sequence.
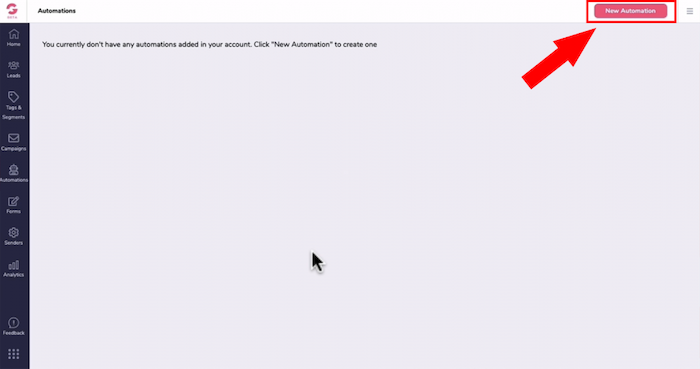
- Head over on the left panel and click on “Automation” then click “Automation”.
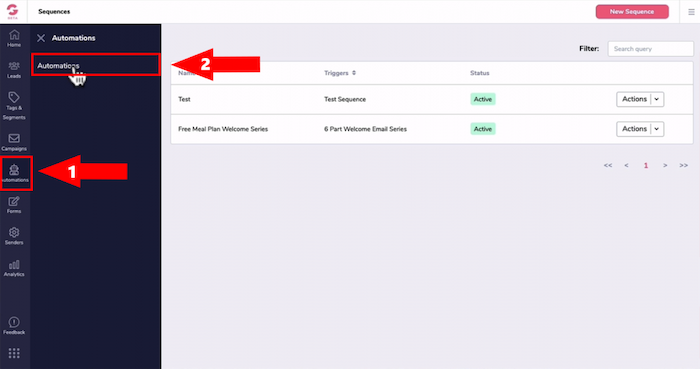
- Then create new automation by clicking on “New Automation”.
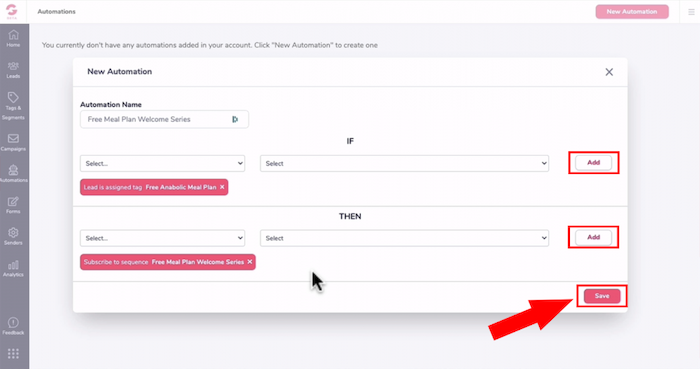
- Under the “Automation Name”, we’ll call that “Free Meal Plan Welcome Series”.
- This is how automation work, you can trigger automation IF something happens THEN this other thing should happen.
- Under “IF”, we can click on the drop-down arrow and say that if a “Lead” is assigned a tag, and they are in the prospect category and the tag under “Select”, is the “Free Anabolic Meal Plan”.
- Click on “Add”.
- Under “THEN”, Subscribe them to sequence, click on the “Free Meal Plan Welcome Series” sequence, and click on “Add”.
- So essentially this automation is saying, “IF contact is tagged with a free anabolic meal plan THEN subscribe them to the free meal plan welcome series”.
- Press “Save”.
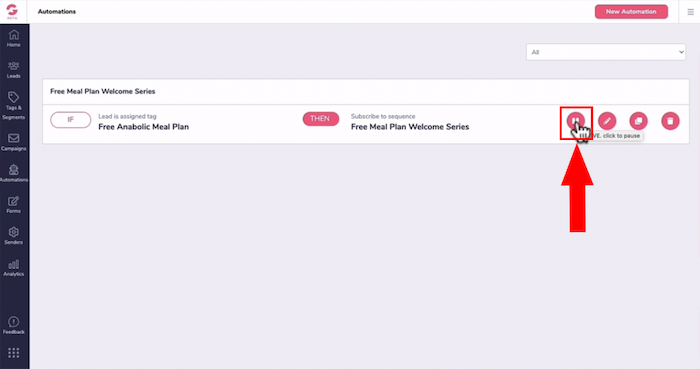
- The last thing to do is press the “Play button” to activate and start the automation.
- If you ever want to pause the automation just click on the “Pause button” to stop the email sequence from starting.
To recap, Head to “Campaigns” then select “Sequence”.

- Go back to the sequence that you created, and click on the drop-down arrow then click on “Edit”.
- You can edit the Email Sequence name and description then click the “Update”.
- Click on the “+Add Trigger” in order for your email sequence to occur.
- Even if you don’t set up a trigger here, you can create automation through “if” and “then” rules.
Creating a Buyer’s Email Sequence Through Automations
- Instead of creating the trigger through the email sequence, you can trigger that sequence through automation.
- It’s really good when you have a contact on your email list who has a specific tag applied to them and the automation will take them through a different journey.
- Head back to “Automation” then click on “Automation”.
- Click on “Edit/the pencil icon” and using the existing automation.
- The automation would be most beneficial for you, especially when you’re selling products and services is the purchase of a product trigger.
- Now, this is really cool because GrooveMail is connected to GrooveSell so I can say that “IF” a contact has purchased a product under the drop-down arrow.
- I can select the Aimee Test which is the product funnel I’ve created under here Aimee coaching test is my product name.
- And over here the price point I would like to create an automation around is called Aimee coaching 30 and then click add.
- “THEN”, you can select “add a tag”, the tag would be under buyers, select purchase 30-minute coaching tag and then click “add”. once contact is applied a tag.
- You can also subscribe to them to another sequence by going to select “Subscribe to sequence”.
- For the next section, I’m going to click on the test and then click “Add”.
- Naturally, you would set up another email sequence for buyer as for this tutorial that I’ve just gone through and select that buyers email sequence here.
- And then you can press “Save”.
- So essentially you can create another automation called “buyer’s email sequence”.
- Under here you can specify that if someone purchases a specific product then tag them with purchase XYZ product and initiate a buy email sequence and then press “Save”.