
If you’re currently with Groove.cm and noticed that GrooveMail doesn’t provide free email hosting…
Don’t worry, I’ve got you covered with a free business email through Zoho Mail setup.
This method is great for those who want to create a free business email without having to pay for additional hosting.
Plus you can add this email address as a verified “Email sender” in GrooveMail.
With Zoho, you can create up to 5 user email accounts attached to 1 domain for free.
In this article, I’ll walk you step-by-step on how to setup Zoho Mail by:
- Adding your domain to Zoho
- Creating a business email on Zoho
- Adding MX records
- SPF records and
- DKIM records
Even though this tutorial is for Groove, you can follow along to this tutorial if your name servers are managed with CloudFlare or a Domain name registry too!
You ready? Let’s go.
Zoho Mail Setup on Groove.cm Name Servers Tutorial
I recommend you watch the video above as I cover everything step-by-step.
Timestamps:
- 00:49 – Beginning of tutorial
- 01:20 – Mobile for verification
- 01:58 – Free Plan
- 02:12 – Adding Domain names
- 02:25 – Adding TXT records domain verification
- 04:30 – Username email administrator
- 05:02 – DNS Mapping – Adding MX records
- 06:23 – Potential errors – propagation
- 06:42 – SPF Configuration – Adding TXT records
- 06:23 – Potential errors – propagation
- 07:37 – DKIM Configuration
- 09:23 – Email interface
- 09:44 – Test email
- 10:13 – Creating email signature in Zoho
Here’s are the steps and screenshots if you prefer the text version of the tutorial:
Zoho Mail Setup
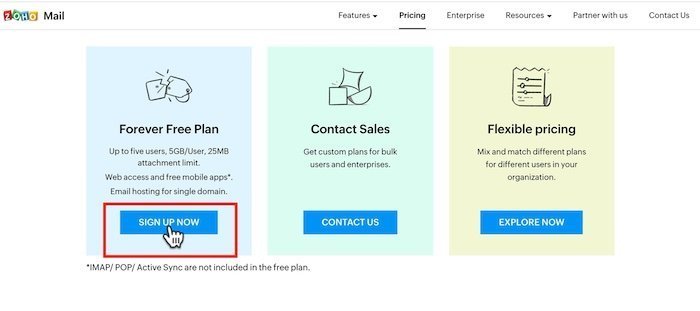
- Head to zoho.com and under Mail, click “Sign up now” button
- You want to select “Business Email” because this will allow you to use your own domain as an email address.
- Don’t select “Personal Email” because that will set up a Zoho dot com email address
- This will take you to the pricing page but you want to scroll down and select the “Forever Free Plan” and sign up.
The next step is entering in your contact details, setting up a password and your contact email address:
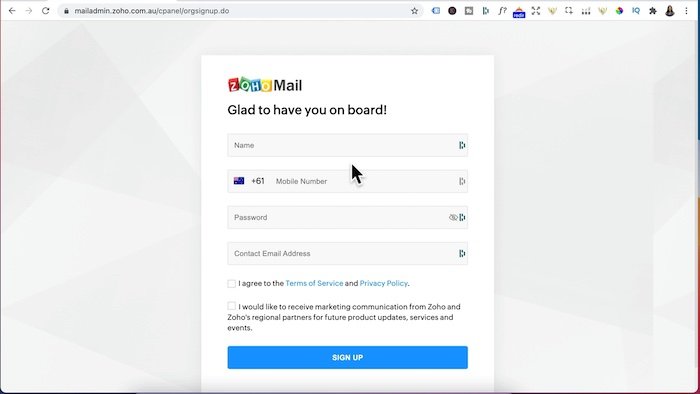
- You can now sign up via your email instead of a mobile.
- You will need to enter in the verification code via email or mobile for verification.
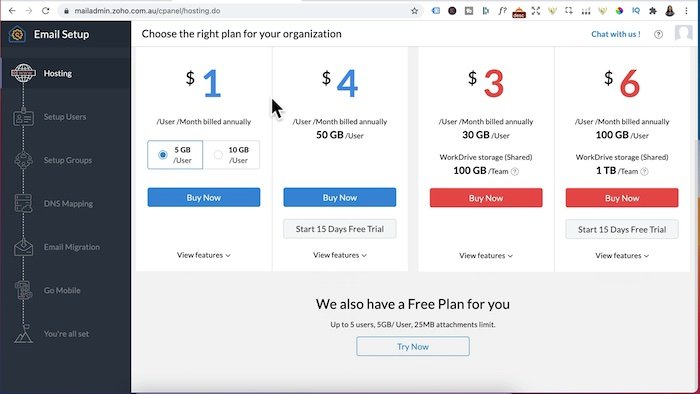
- Once you entered in your one time password, you will arrive at the email setup interface with pricing options.
- Scroll down to “We also have a Free Plan for you” and click on “Try now”
After you click on “Try Now”, the next screen will walk you through the steps to setup your business email account.
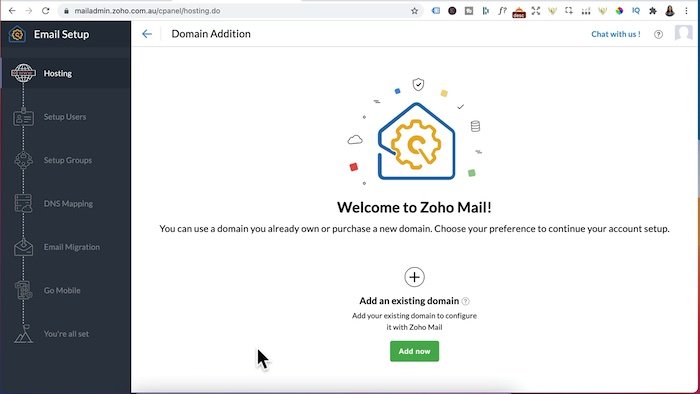
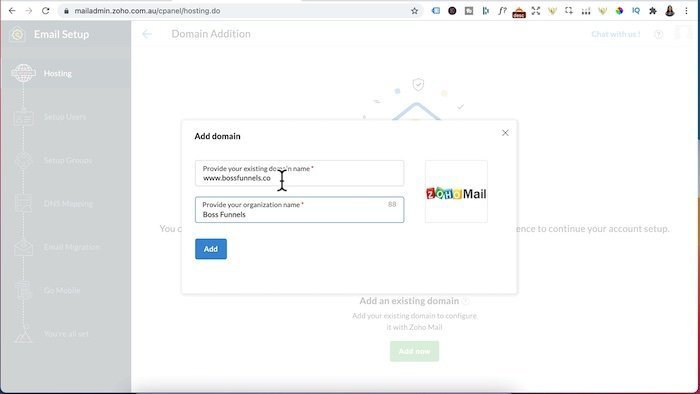
The first step is adding an existing domain in order to create your free business email with Zoho mail:
- Click on “Add Now”
- Enter in your domain name – ie your domain dot com
- Enter in your Organization or business name
- Click the blue “add” button
Now that you’ve added in your domain, click on “Proceed to Domain Verification”
Zoho Domain Verification
You need to prove that you own your own domain by adding a TXT record in your Domain Name Servers (DNS).
My DNS manager is on Groove however the same process I’m about to go through will work with Cloudflare or a domain name registry.
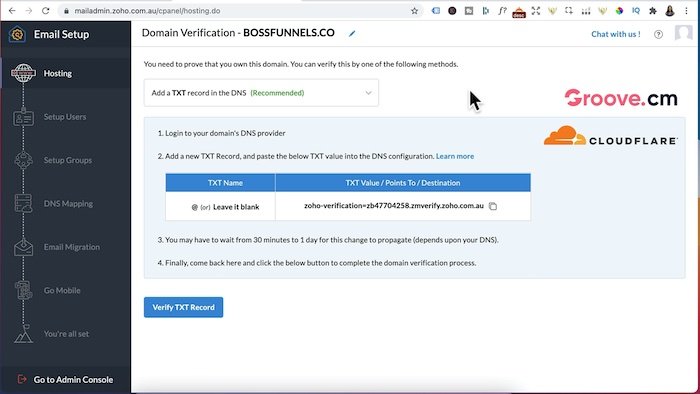
- Click on the TXT Value / Points to / Destination from Zoho to copy it.
- Login to Groove.cm to add these records.
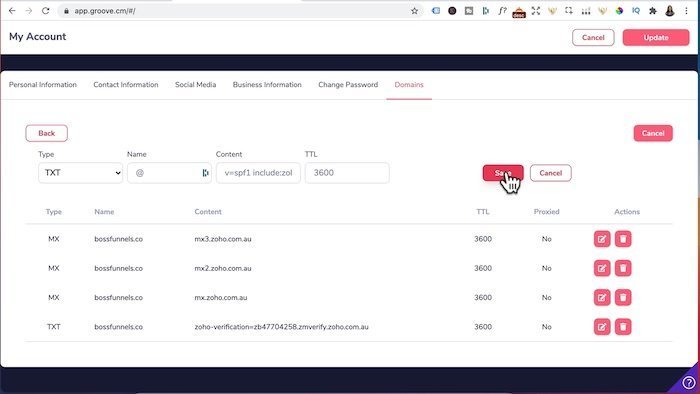
Adding DNS Records For Email Accounts on Groove.cm
To add the TXT records to Groove.cm
- Copy the TXT record from
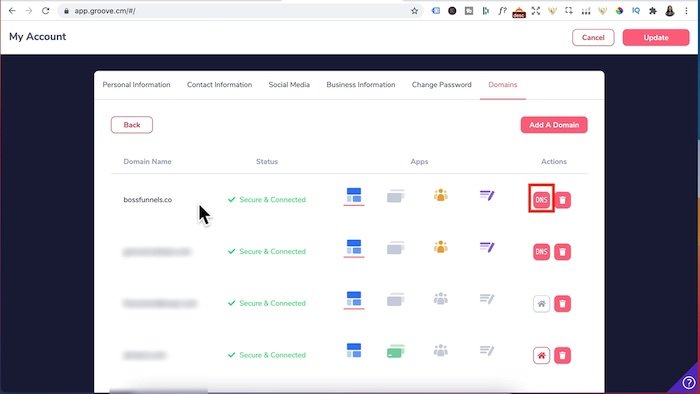
- Head to Groove, “domains” tab
- Locate your domain, to the far right, click on the “DNS” button as per below screenshot:
- Click on “Add Record”
- Under “Type”, click on the drop down and select “TXT”
- Under Name, enter in “@”
- Under Content, paste the TXT value Zoho gave you
- Under TTL, leave as is
- Press Save

Once you entered in the TXT records in Groove, head back to Zoho and click on “Verify TXT Record” as shown in the screenshot below:
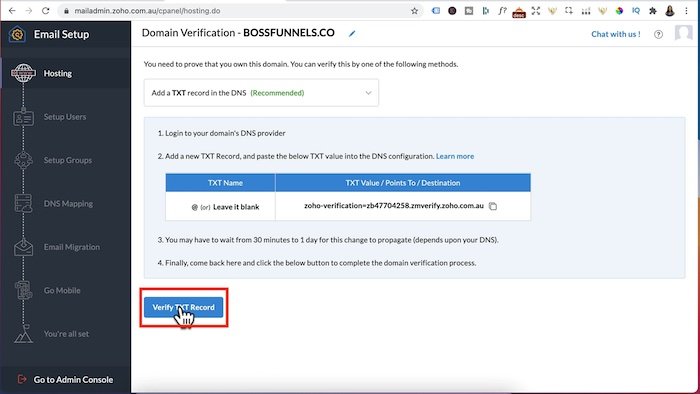
You will get a green tick stating that your domain has now been verified with Zoho.
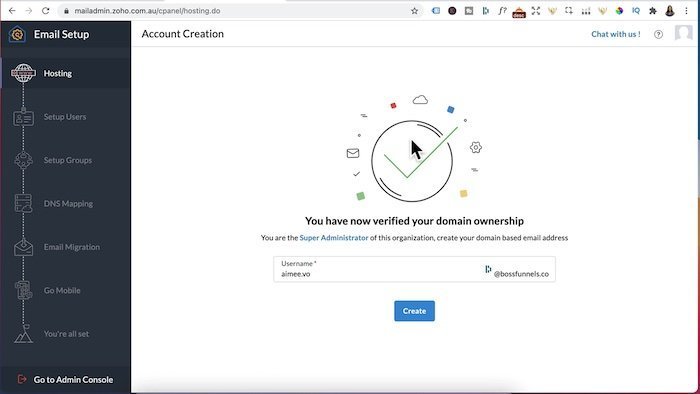
Creating a Username on Zoho Mail
Now that your domain has been verified with Zoho, it’s time to create a username for the administrator.
- I’m just going to give this username as “aimee” but you can set up any username you like.
- Once you’ve chosen a username, click on “create”
- You can add 4 more emails accounts connected to this domain
- I’m just going to add one email account in this example
- Click on “Proceed to Setup Groups”
- You can also organise your emails into groups
- However we don’t need to setup groups, so we will click on “Proceed to DNS Mapping”
DNS Mapping – Add MX, SPF & DKIM Records To Groove.cm
For DNS mapping, you need to add MX records, SPF & DKIM records in order to send and receive emails using your email domain.
Adding MX Records to Groove.cm
MX means Mails Exchange and you will need to add 3 MX records to Groove.
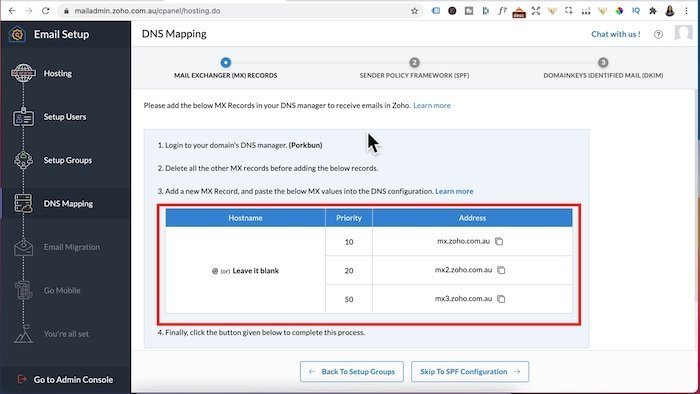
- Under “Address” click on the copy icon to copy the MX record
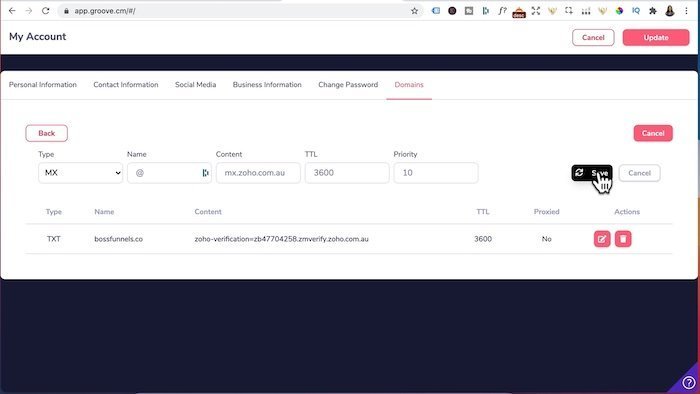
- Click on “Add Record” in Groove DNS
- Under “Type”, click on the drop down and select “MX”
- Under Name, enter in “@”
- Under Content, paste the MX value under “Address” that Zoho gave you
- Under TTL, leave as is
- Under Priority, enter in “10”
- Repeat the same steps for the remaining 2 MX records
- Be sure to enter in the correct MX record and corresponding priority level 20 and 50
- You will end up with 3 MX records as per the below screenshot:

After you’ve entered all 3 records, head back to Zoho and click on “Verify MX Records”
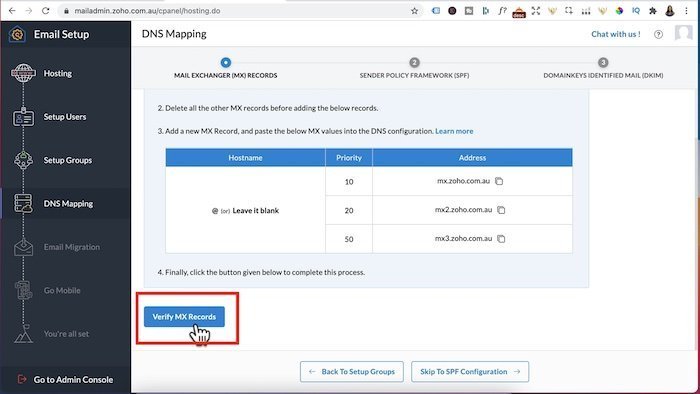
If you get a screen with a green tick stating “Your Domain’s MX Records are pointed to Zoho”, then it’s been added successfully.
The next step is clicking on “Proceed to SPF Configuration” button.
Adding SPF Records to Groove.cm
SPF stands for Sender Policy Framework which is an authentication method that permits IP addresses to send emails using that domain name.
It’s the same process and you will need to add A TXT Record for your SPF in Groove:
- In Zoho, under “TXT Value” click on the copy button
- Head back to Groove DNS
- Click on “Add Record” in Groove DNS
- Under “Type”, click on the drop down and select “TXT”
- Under Name, enter in “@”
- Under Content, paste the TXT Value that Zoho gave you
- Under TTL, leave as is
- Press Save
NOTE: IF you have any old MX or TXT records from old email hosting and you want to move them over to Zoho – delete the old email records and use only Zoho’s records.
On Groove’s name servers, it does take a bit longer for the DNS records to propagate.
So if your SPF records don’t verify straight away, please wait a couple hours and come back to verify your SPF records.
Click on “Proceed to DKIM Configuration”.
Adding DKIM Records to Groove.cm
DKIM is Domain Keys Identified Mail – basically it verified that an email was sent from an authorized mail server.
So if you want better email delivery and avoid emails going to the spam folder, add DKIM records.
It’s the same process and you will need to add A TXT Record for your DKIM in Groove:
- In Zoho, under “TXT Value” click on the copy button
- Head back to Groove DNS
- Click on “Add Record” in Groove DNS
- Under “Type”, click on the drop down and select “TXT”
- Under Name, enter in the “TXT Name” that Zoho Gave you
- Under Content, paste the “TXT Value” that Zoho gave you
- Under TTL, leave as is
- Press Save
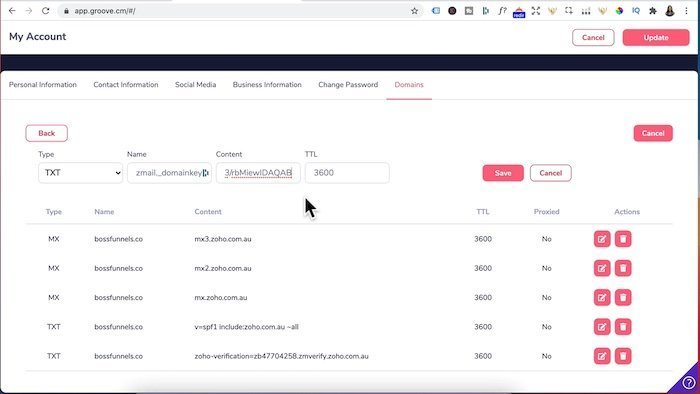
- Now head back into Zoho
- Click on “Verify DKIM Records”
If you get a green tick stating “DKIM Records for your domain is pointed to Zoho” then you’re good to go.
- Click to proceed email migration button
- Now this tutorial is for new email accounts and you won’t have to migrate any emails over.
- But if you have any existing email accounts that you have deleted and now using ZOHO for email hosting, then follow these instructions listed here.
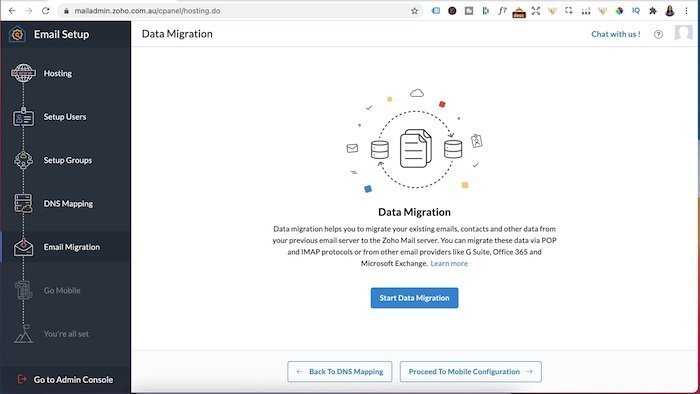
I’m going to skip this and “proceed to mobile configuration”.
- They’re going to ask you to download their mobile app to manage your emails and check emails on the go.
- You can download the app if you want to but if you don’t use this email address frequently, everything can be accessed via their website.
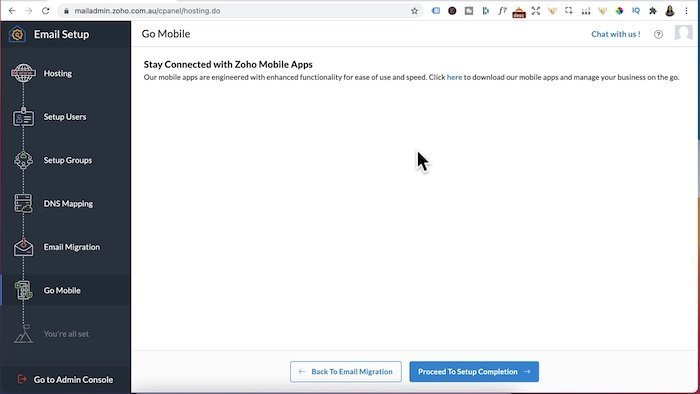
Click on “Proceed to Setup Completion” and you’re DONE!
Please support this website by signing up to Groove using the links below and you’ll also receive some amazing bonuses from me as well!
How To Increase Click Through On Emails
If you’re pitching your own products or service, one way to get people to click on your email links is to add an image that SHOWS your product in action.
People are usually skimming your email but they stop when they see a compelling image.
You NEED unique custom 3d mockups, book covers, lead magnet images, online course mockups… to get that click.
I’ve always struggled with design and could not justify hiring expensive graphic designers.
Not anymore.
The banner below was created WITHOUT any design skills and under 60 seconds.
Just point-and-click, drag-and-drop, then export!
Click the banner to learn how you can create stunning 3D digital product mockups to use in your emails or sales funnel without any design skills.